Swift Usage
This page explains how to use ContextDecision to calibrate your custom model, and how to make decisions based on the predictions.
- Step 1: Add ContextSDK to your app
- Step 2: Ship app into production in Calibration Mode
- Step 3: Once the model is ready, you can start making decisions based on the SDK's predictions
Usage
- Use a different, unique
flowNamefor each upsell funnel (e.g.upsell_prompt,upsell_onboarding, etc.)- If you have the same purchase flow, but from different parts of your app, please use different a different
flowNamefor each. - We automatically analyze the overlap between different flows, to decide if there should be one, or more models.
- If you have the same purchase flow, but from different parts of your app, please use different a different
- The timing is crucial: You need to create the
contextobject right before showing your prompt, and then log the outcome of the user interaction after the user has either accepted or dismissed the prompt. - For each
contextobject you create, be sure to log at least one outcome, even if the user dismisses the prompt.
We recommend using this approach for most apps, unless you have a specific reason to use the advanced methods.
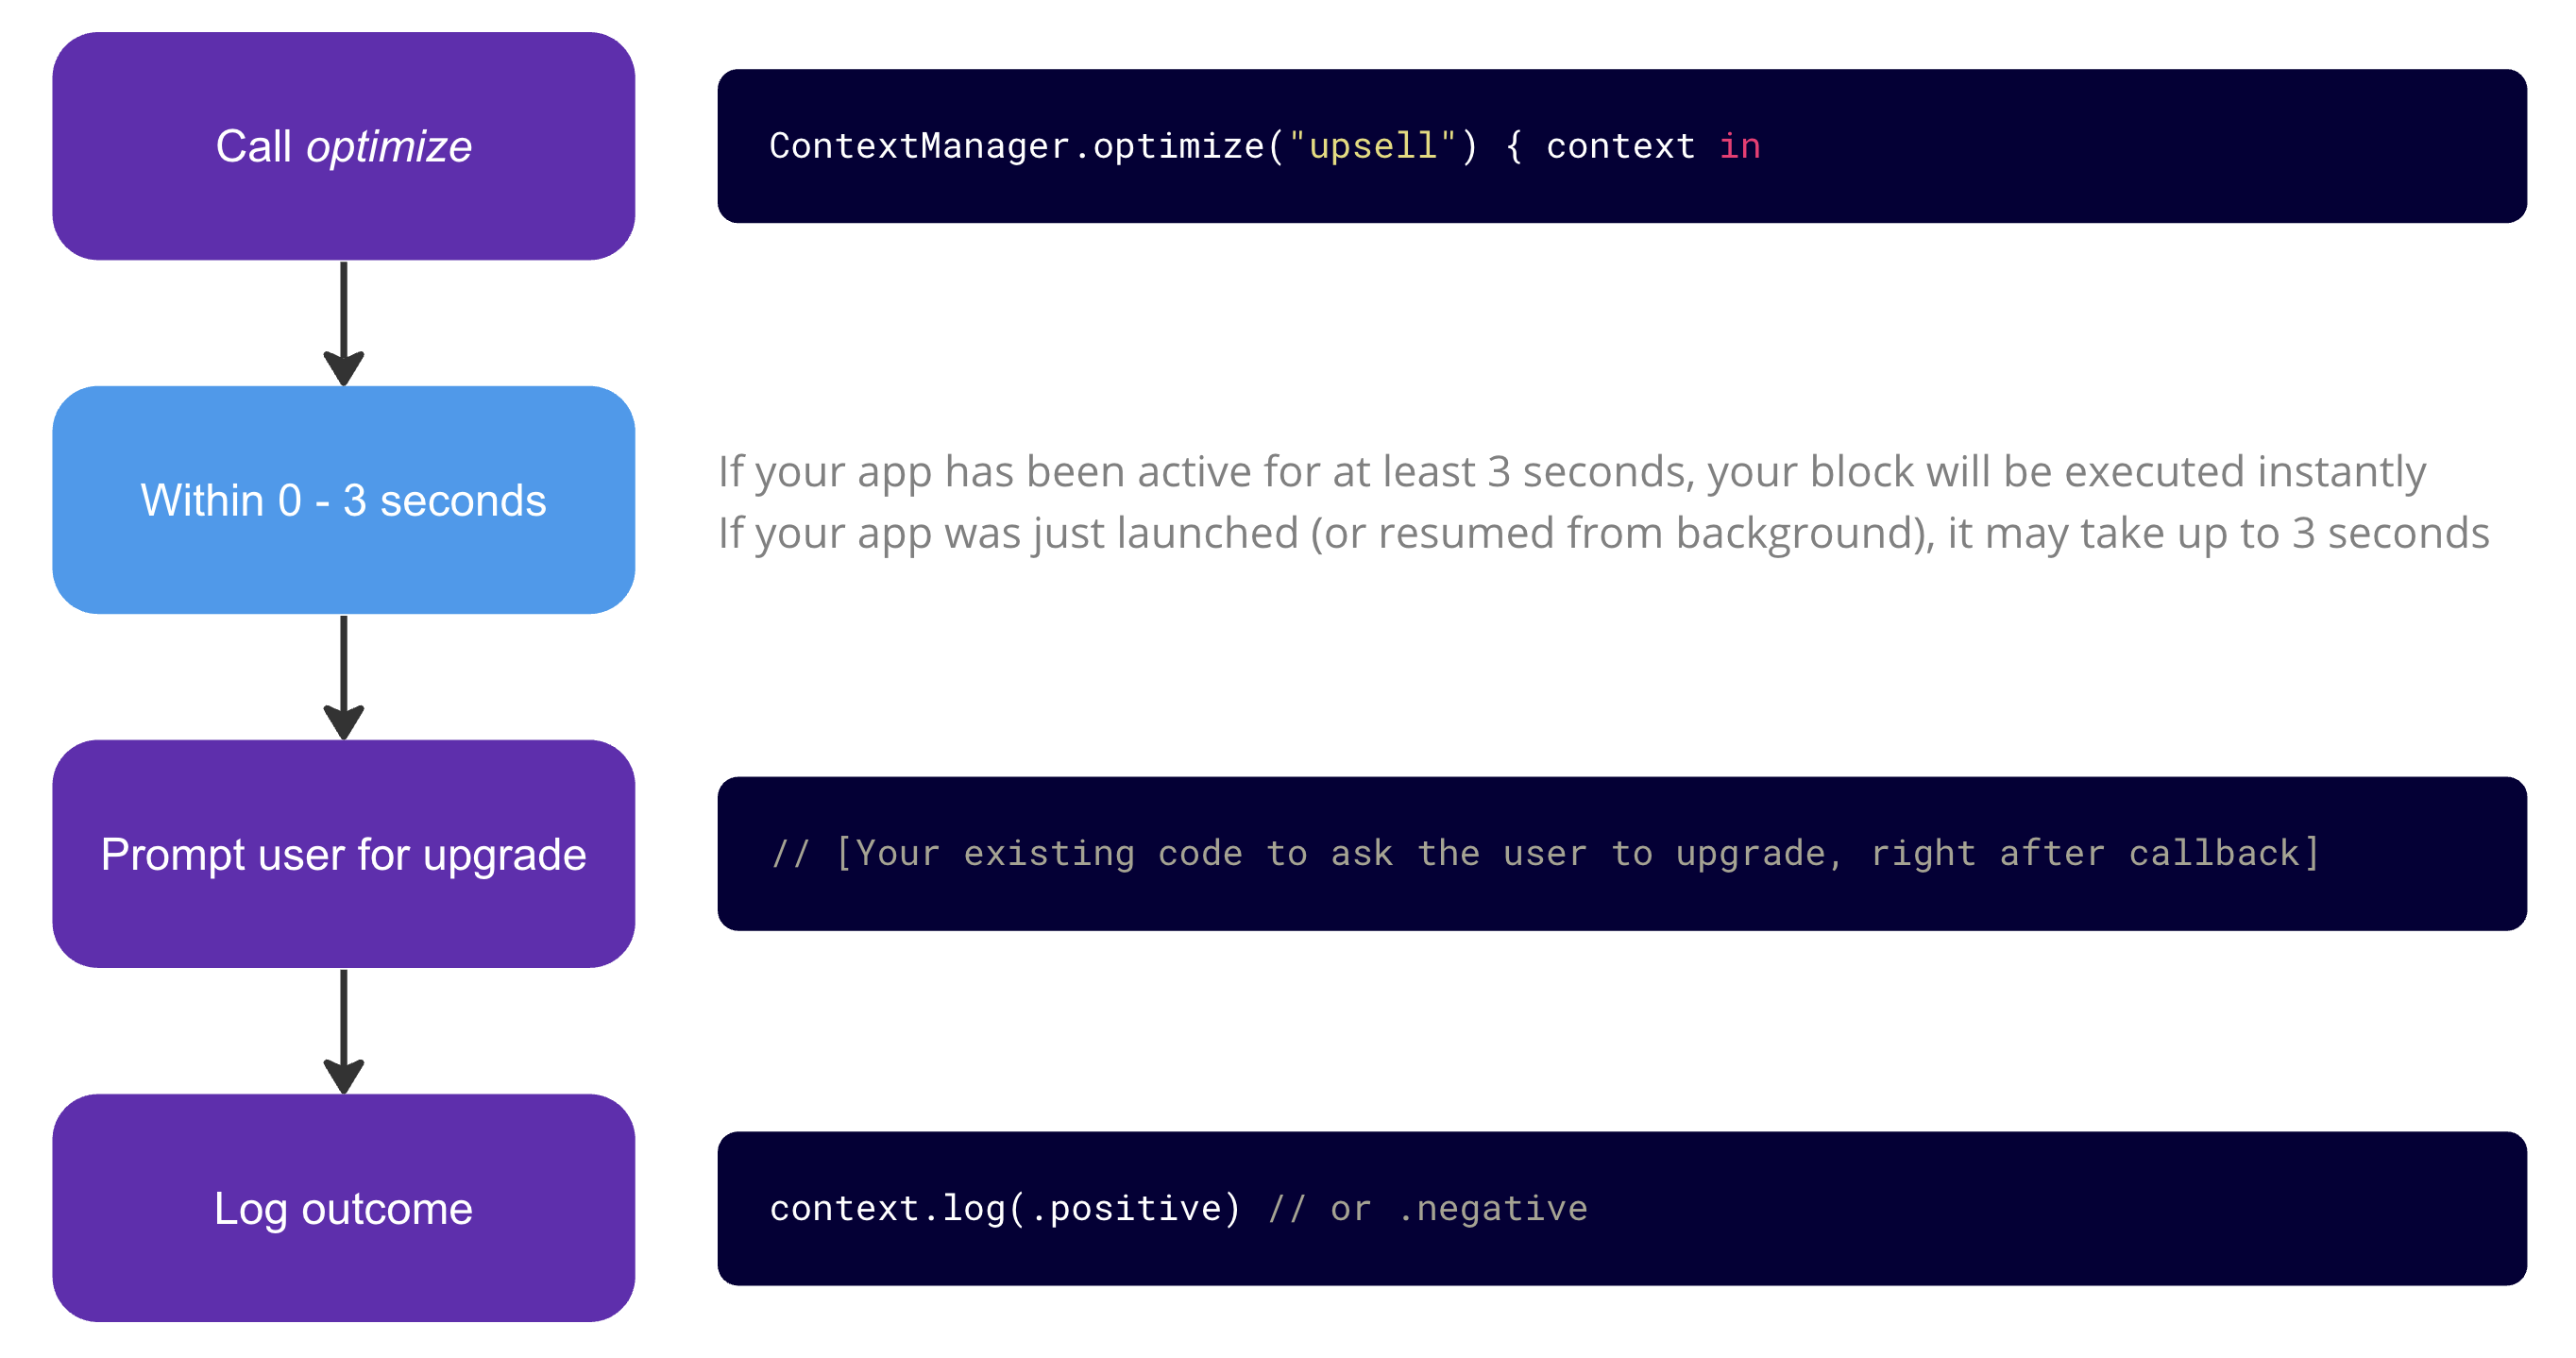
In most cases, ContextSDK will execute your block instantly. Only if your app was recently launched, or resumed from the background, it will take up to a few seconds to get a full context.
ContextManager.optimize(flowName: "upsell") { context in
  // [Show the upgrade prompt here right after fetching the context]
  // Once you know if the user purchased or dismissed the upsell, log the outcome:
  context.log(.positive) // or .negative
}
It's critical you trigger your prompt inside the block, which behaves as follows:
- The callback is instantly executed if your app has been running for at least 3 seconds
- The callback being executed within 3 seconds if your app was just put into the foreground recently
Use Instant Callbacks if you want to show a prompt right after a user action (e.g. opening a screen)
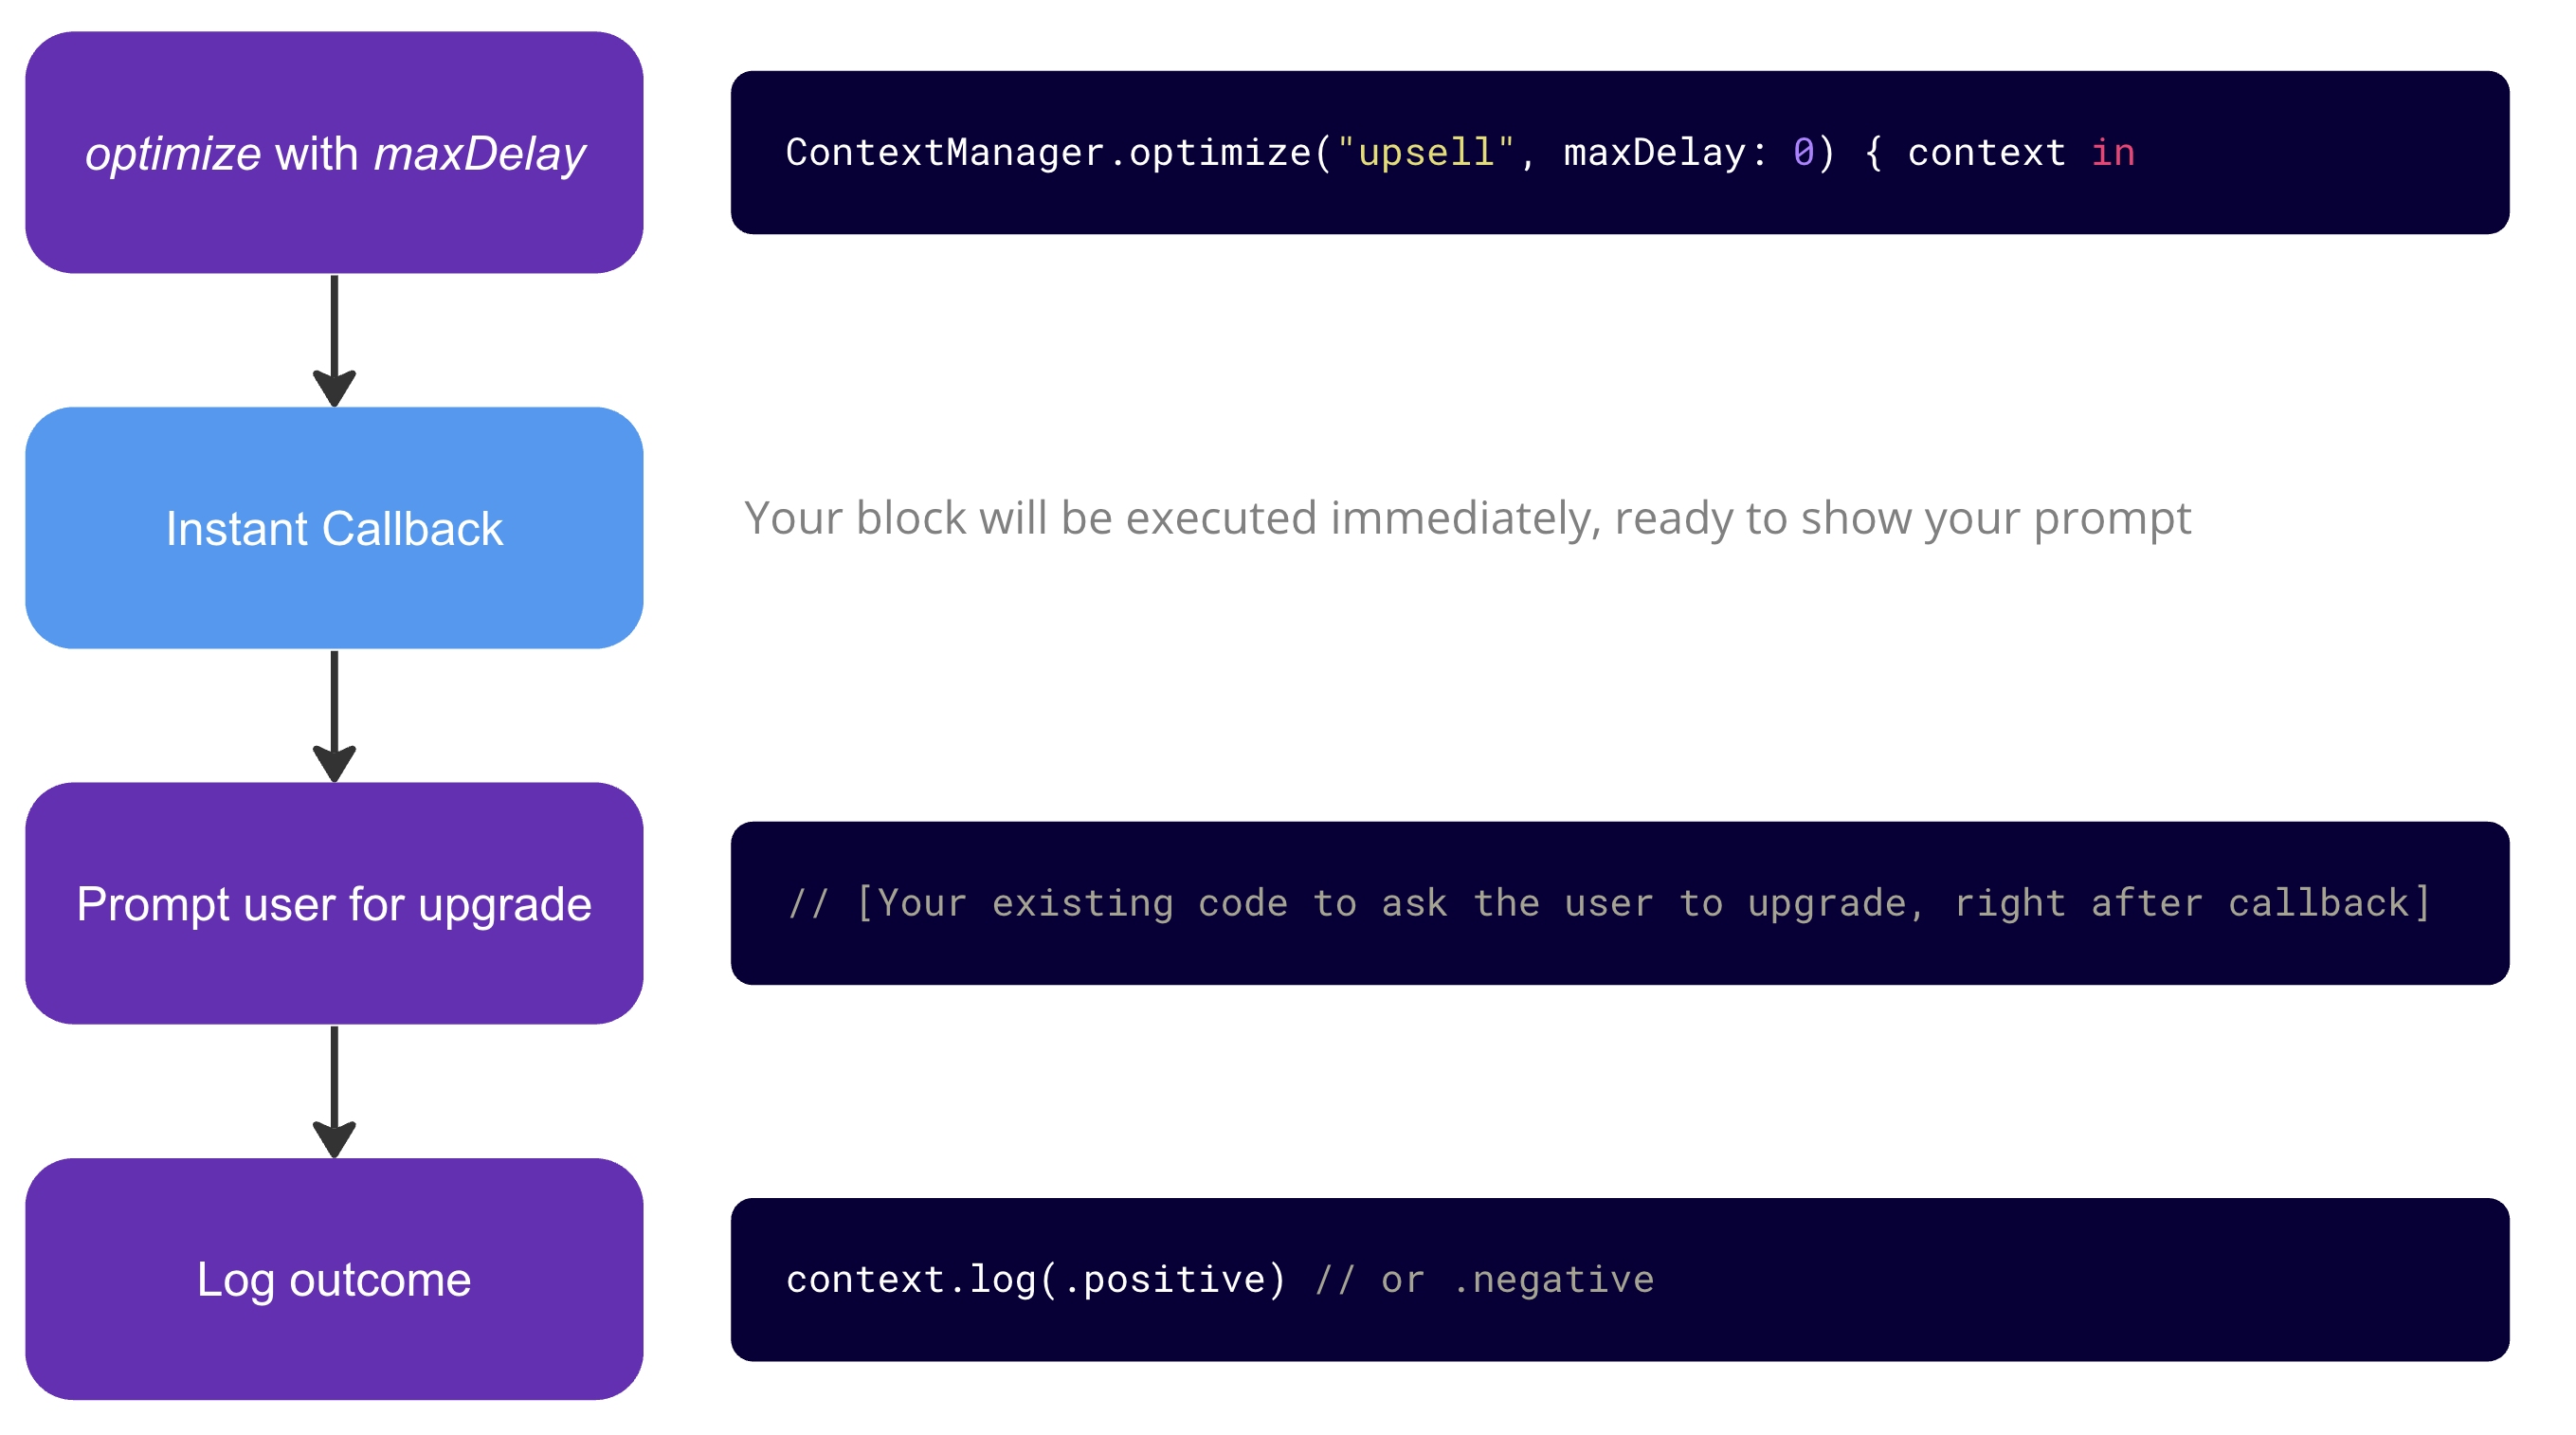
There are cases where you may prefer to always instantly have your callback executed. For example, when you want to show a prompt right after a certain user-action, to prevent the prompt showing up when the user already left the screen.
ContextManager.optimize(flowName: "upsell", maxDelay: 0) { context in
  // [Show the upgrade prompt here right after fetching the context]
  // Once you know if the user purchased or dismissed the upsell, log the outcome:
  context.log(.positive) // or .negative
}
Using maxDelay: 0 means that the context object may not be complete, which may reduce data quality. We recommend not using this approach right after the app start. Use in places where the app usually has already been running for a few seconds.
If you want full control, you can use the instantContext method to get a Context object instantly. This comes with some extra complexity, as you also need to check the .shouldUpsell property yourself to decide if you should show the prompt or not.
let context = ContextManager.instantContext(flowName: "upsell", duration: 3)

if context.shouldUpsell {
    // [Show the upgrade prompt here right after fetching the context]
    // Once you know if the user purchased or dismissed the upsell, log the outcome:
    context.log(.positive) // or .negative
} else {
    context.log(.skipped) // ContextDecision recommends not to show an upsell
}
During calibration phase, .shouldUpsell will always be true, so your app's behavior won't change. Once your custom model is rolled out, the .shouldUpsell property will reflect the prediction of your model.
Helpers
Some apps may not have an easy way to pass the context object from where you initially generate it, to where you know the outcome of the user interaction. In those cases, you can use the recentContext method to get the most recent context object you created based on the unique flowName.
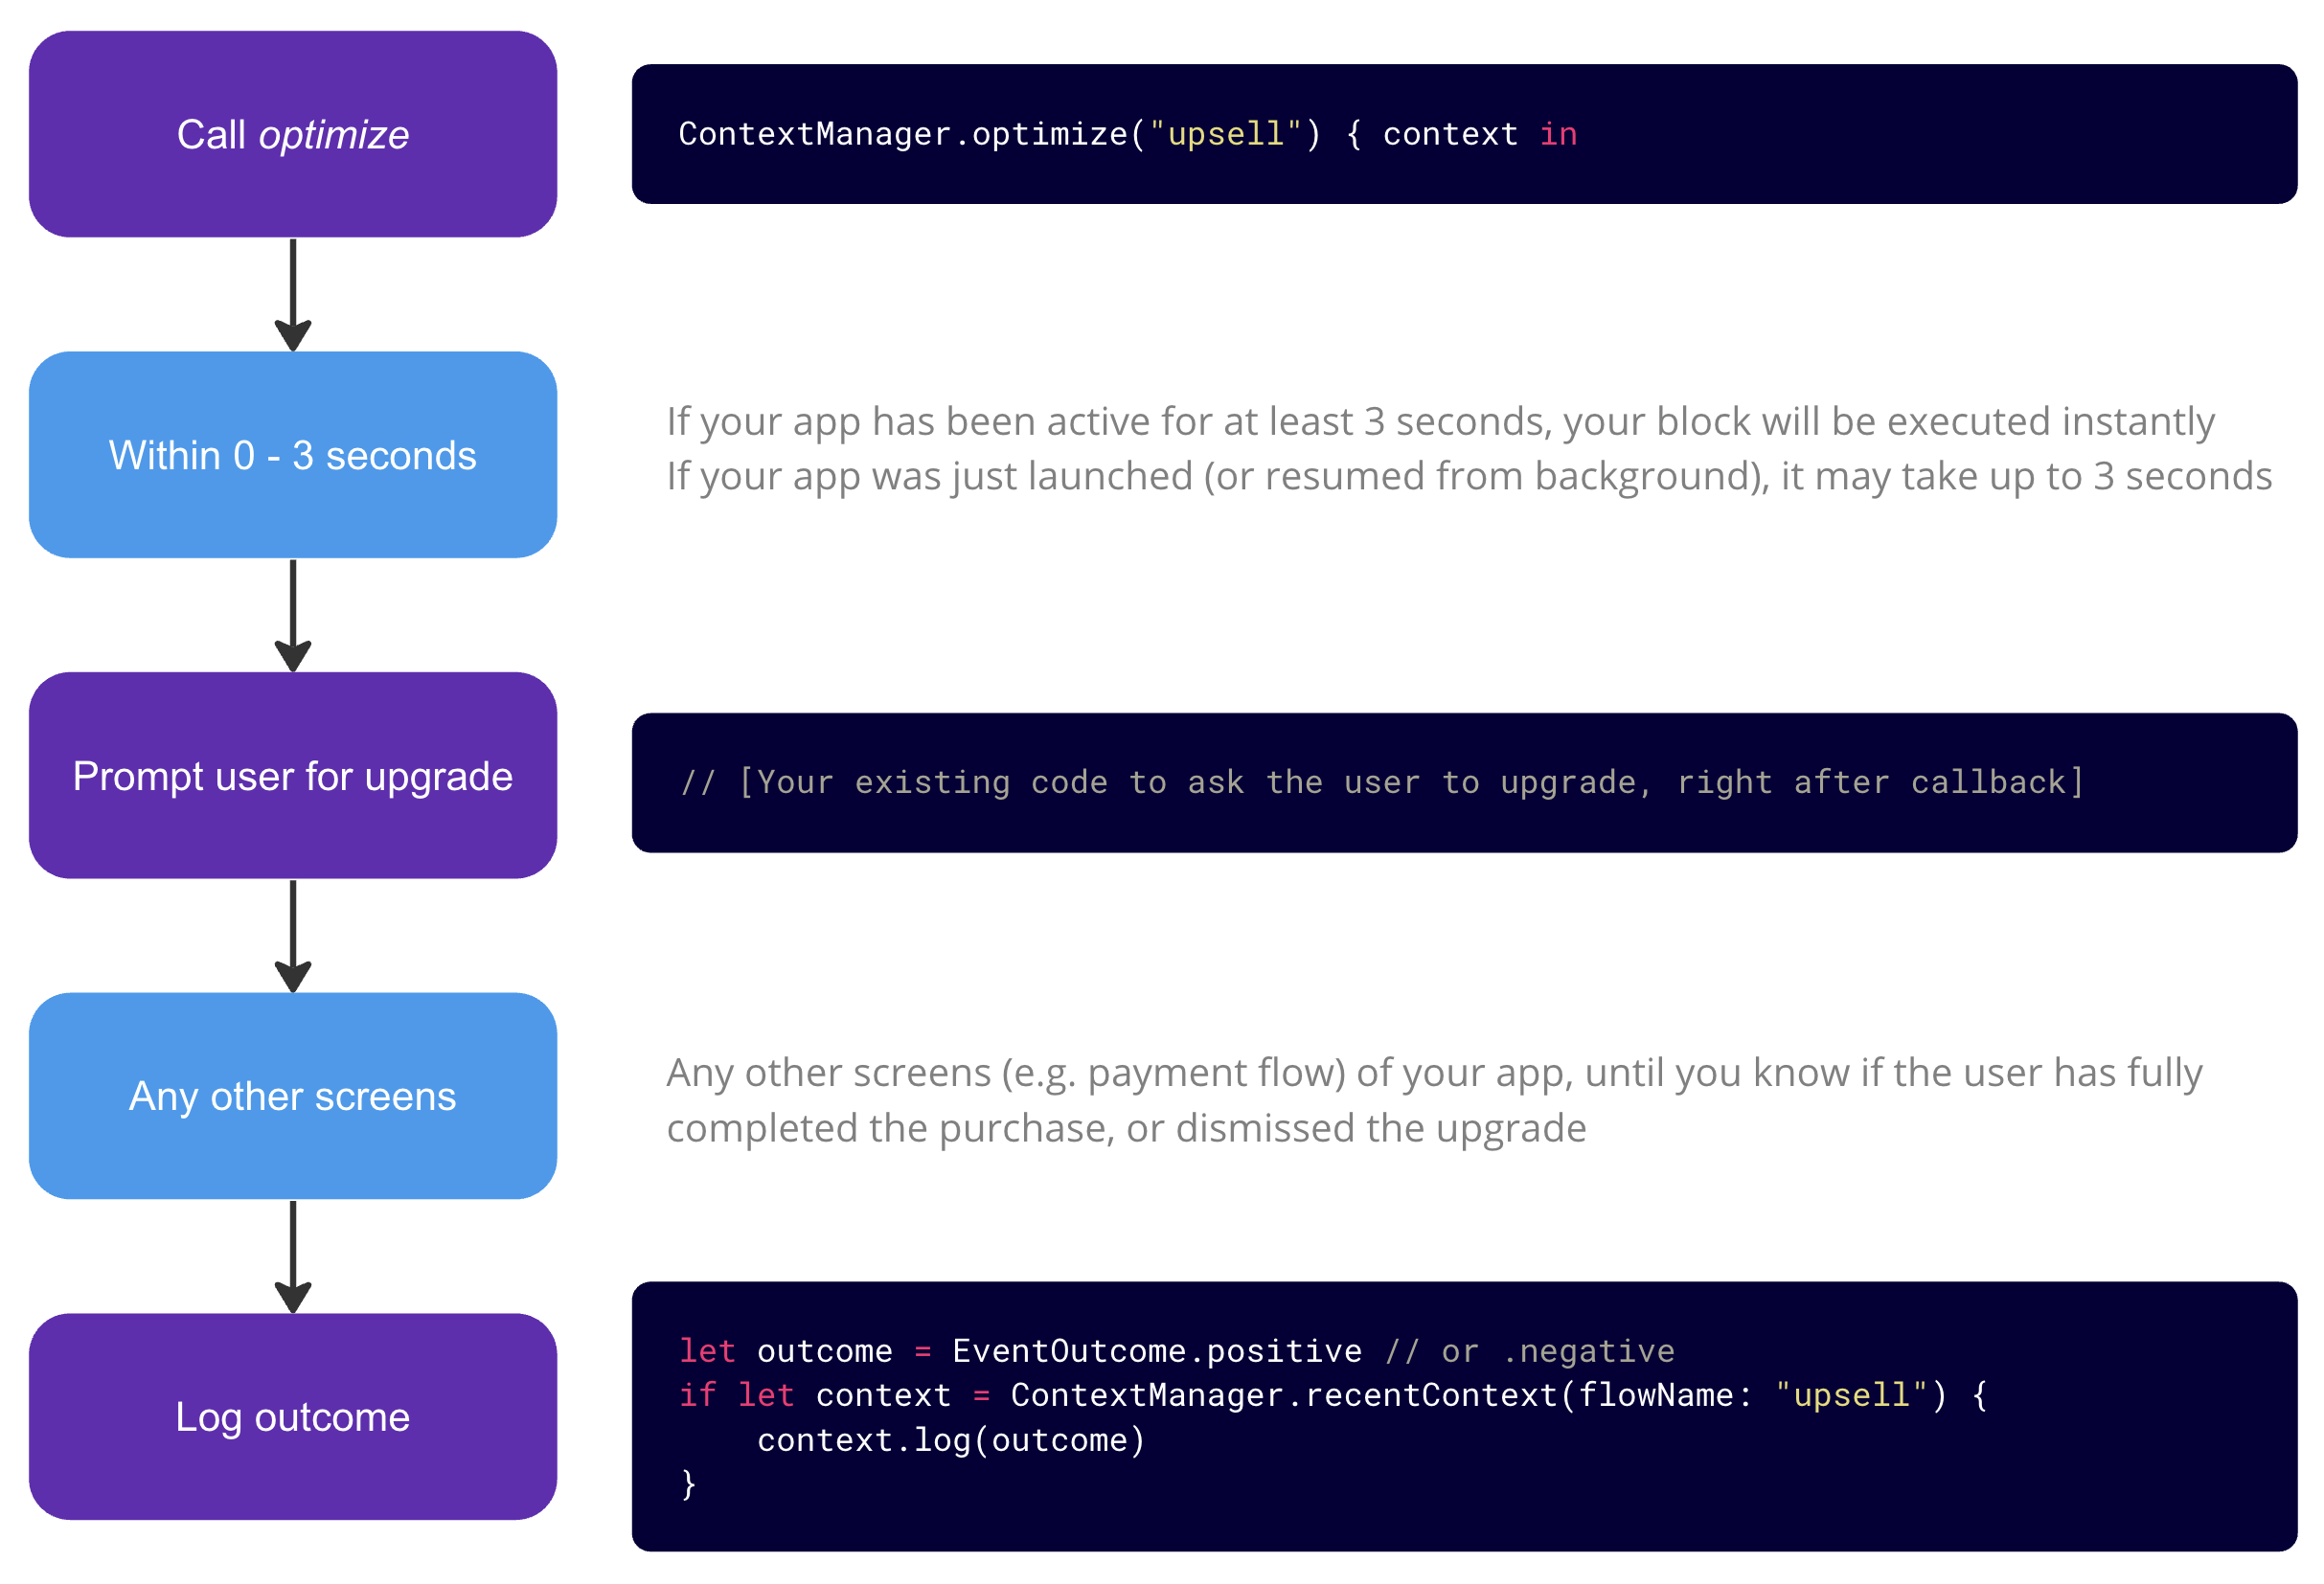
- This approach requires you to create the
contextobject first. - Only the most recent
contextfor eachflowNamename will be stored, and oldercontextobjects will be discarded. - The
contextobject must already be created before you show the prompt.
You can provide additional outcome details, for example to indicate which type of product the user has purchased.
ContextManager.optimize(flowName: "show_all_deals") { context in
  // [Show the user a list of deals]
  if let selected_deal = user.selectedDeal {
    context.appendOutcomeMetadata([
      CustomSignalInt(id: "deal_selected", value: selected_deal.number),
      CustomSignalInt(id: "deal_value_in_usd", value: selected_deal.usd_value)
    ])
    context.log(.positive)
  } else {
    context.log(.negative)
  }
}
The information provided via the appendOutcomeMetadata will not be used to determine if it's currently a good moment. You can use Custom Signals for that.
The information provided is used to help you decide on variants. For example, you may have different types of offers, or different price points, and you want to train ContextSDK to recommend the best one based on the current user context.
When logging an outcome of an upsell prompt, we recommend using the .positive and .negative outcomes directly. However, there may be cases where you want more fine-grained control over the outcomes. For example, you may want to log if the user has interacted with the banner, or if the user has tapped on an advertisement. For those cases, we offer the following additional outcomes you may use:
.positive: Generic positive events used when the user has to decide on the spot (e.g. full-screen prompt).positiveInteracted: The user has tapped on the banner, and started the purchase flow, or read more about the offer.positiveConverted: The user ended up successfully purchasing the product (all the way through the payment flow).positiveAdTapped: The user has tapped on an advertisement
.negative: Generic negative events used when the user has to decide on the spot (e.g. full-screen prompt).negativeNotInteracted: The user has not interacted with the banner in any way, and continued using the app.negativeDismissed: The user has actively dismissed the banner (e.g. using a close button)
Banners
Upsell prompts force the user to make a decision to either accept, or dismiss the prompt. However, when showing a banner, the user may just ignore the banner (not interact with it), and continue using the app. In those cases, you may want to log the outcome of the banner at a later point in time.
For the .negativeNotInteracted cases, we recommend logging the outcome when your app is being closed, or if the screen where you show the banner is being closed. For that, you can use the context.logIfNotLoggedYet method:
// You can use your existing code you execute when the user closes your app,
// or alternatively when the user closes the screen where the banner is shown
func applicationDidEnterBackground(_ application: UIApplication) {
  if let context = ContextManager.recentContext(flowName: "onboarding_upsell") {
    context.logIfNotLoggedYet(.negativeNotInteracted)
  }
}
Note that as soon as you call .log or .logIfNotLoggedYet on a context, it will be marked as "logged", even if you fetch it again using recentContext.
- Using
.logwill always log the outcome, even if it has already been logged before - Using
.logIfNotLoggedYetwill only log the outcome if it hasn't been logged before
When using the block-based .optimize syntax, there may be cases where you want to prevent the callback from being invoked because the context is no longer relevant. For instance, if the user has navigated away from the screen where you intended to show an upsell prompt, showing the prompt may no longer make sense.
In such situations, you can use the cancelContextCallback method to cancel the callback for a specific flowName, preventing the prompt from being shown if it hasn’t already been displayed. This is especially useful if the context evaluation takes a few seconds and the user leaves the screen before the prompt can be displayed.
This ensures that ContextSDK will not attempt to show the prompt if the chance to display it has passed.
Custom Signals
ContextSDK uses more than 200 signals based on various built-in sensors to make its predictions. However, you can improve its performance by providing additional data to the ContextSDK that's specific to your app. Some examples of what you could provide: in-game progress, number of friends/messages, number of entries in a list, etc.
Global signals will be used across all ContextSDK calls, and are an easy way to provide additional data to the ContextSDK.
You can easily override the global custom signals by providing the same id when calling the setGlobalCustomSignal method again using a different value. To remove a global custom signal, call the setGlobalCustomSignal method with a nil value.
In general, we recommend using global signals. But if you have custom signals that are specific to a certain flow, you can provide them as a parameter when getting your context object:
Please be sure to consider the user's privacy and don't include any sensitive data. You are responsible for ensuring that you have the necessary rights to provide the data to us. Please at no point include any PII (including but not limited to emails, user IDs, IP addresses, exact locations, etc.) in your custom signals.
Custom Model Rollout
Once you've shipped your app with ContextSDK in calibration mode to the App Store, and you've collected around 1,000 sales events, we can start training your custom machine learning model to optimize your app.
Your custom model is trained on your app's data and is unique to your app. This ensures that the model performs the best for your app, and your user-base.
Our recommended approach is to distribute your machine learning models over-the-air directly to your app. This works instantly, uses minimal system resources in the background, and allows us to iterate faster and more efficiently to further improve your app's performance.
In the future, you'll be able to launch your first custom model on our Dashboard, but for the time being, we will reach out to you via email once your first model is ready.
If you're using optimize, no code changes are required.
- If ContextSDK believes it's currently a good moment to show the prompt, it will run your block
- If ContextSDK believes it's currently a bad moment to show the prompt, it will not run your block
If you're using the advanced usage using instantContext, you'll need to check .shouldUpsell yourself to decide if you should show the prompt or not.
Our OTA rollouts are safe, reliable, and won't affect your app's performance. Our systems continuously monitor the rollout and the resulting conversion performance to ensure everything is working as expected.
If you prefer to disable Over-the-Air updates, we can provide you with a custom SDK binary that includes your custom model. Please drop us a short email at support@contextsdk.com containing your installation method (CocoaPods, SPM, or manual), and we will get you started.
Additional Entry Points
Enhance user engagement by strategically adding new entry points for prompts, paywalls, or ads based on user context. ContextSDK enables you to add new triggers that respond dynamically to users’ real-world activities, helping you introduce upsell opportunities that are either too annoying to users or require a lot of effort to create a custom decision logic manually.
See below some examples of where you and your team could add additional prompts:
After a user completes a key action — such as signing up, finishing a level, editing a photo, or completing a workout — you can use ContextSDK to determine if this is an ideal time for a prompt. ContextSDK’s model evaluates each situation based on user context, allowing you to replace rigid conditions with intelligent, context-aware timing.
Example: Replace "every 5 levels completed, if it’s a weekend and if the user hasn’t been prompted in the last 2 hours, show a paywall" with ContextSDK’s shouldUpsell boolean. Simple as that.
Identify natural pauses in your app, like loading screens or cooldowns, where users may be more receptive to an ad or prompt, all while keeping user churn in mind. ContextSDK’s contextual understanding can evaluate which idle moments are opportune to prompt them, aiming best conversion timing.
Implementation Best Practices
- Every app is different: different app types (e.g., fitness, gaming, dating, entertainment) may benefit from unique entry points. Identify key moments in your user’s journey and leverage ContextSDK’s on-device signals to time interactions naturally.
- Experiment and iterate: after identifying new entry points, reach out to our team to get experiments going. We will constantly fine-tune your ML models improving prompt timing as you gather more data.
Using these strategies, you can introduce additional, relevant entry points that enhance the user experience while maximizing conversion opportunities.
Logging Custom Events
Optionally, you can log custom events for analytics purposes, to get insights into the real-world context of your users.
The events you log using this code is for informational purposes only and will not influence your custom model.
Use this to track users navigating through different screen in your app. It allow us to provide you insights into which screen is most commonly used in which real world context.
Use this to track certain user actions, like when a user enabled a certain feature, when a user tapped a button, when the user created an account, or when the user shared something. This allows us to provide you insights into which user actions are most commonly done in which real world context.
Use this to track certain events in your app. This can be used generically to track any type of event. For example, you can add this to your existing analytics code to log all your existing events into ContextSDK. This allows us to provide you insights into which events are most commonly triggered in which real world context.
Advanced Usage
Depending on your preference, ContextSDK has a built-in AB test feature. However, if you prefer to use your own AB test system to better compare the results, you can provide the AB test info to ContextSDK.
Step 1: Choose Control Mode
ContextSDK exposes a ContextManager.setControlMode function which allows you to enable control mode. When control mode is enabled, ContextSDK will not make any decisions
Step 2: Provide AB Test Info
ContextSDK exposes a ContextManager.currentAppliedCustomModelVersion function. This gives you the current version of all custom models currently used in the ContextSDK installation. During calibration phase, the value will always be calibration.
Once your first custom model is ready this will return a string uniquely identifying it. You can track this in your own analytics to observe model rollouts.
The minimum deployment target for ContextSDK is iOS 14.0.
We understand that using a hosted service comes with privacy and security concerns and additional paperwork. We also support the most commonly used analytics systems, such as Firebase, Amplitude, Mixpanel, etc. instead of our own server. This allows you to not send any additional network requests from your app, as well as use your existing infrastructure to use ContextSDK.
Using your own backend however comes with a few downsides:
- The initial setup will take significantly more time
- You'll have to periodically share the collected ContextSDK signal data with us, either through some kind of scheduled query or cron-job, or by sending us the data manually
- If your app has a high volume of active users, you'll have to make sure your existing tools can handle the load, in particular being able to export large amounts of data
- You won't have access to some of the additional features we provide, such as a real-time dashboard of the ContextSDK performance monitoring, as well as Over-The-Air updates of custom models, and the ability to tweak the prompt intensity level in real-time for each flow
- There is a significantly higher likelihood of errors, due to having more moving parts (your logging system, your data pipeline, your export scripts)
If you're interested in using your own backend, please reach out to us at support@contextsdk.com to get you started.
ContextSDK runs silently in the background, using almost no device resources. We built it from the ground up to have no effect on the app using it. Unless you have specific concerns about specific configurations, we recommend leaving the default options.
You can override the default configuration by passing a Configuration object to the setup method:
// Below you can see the default values for each configuration option
let configuration = ContextSDK.Configuration(
  // Count the number of touches: Uses a `UITapGestureRecognizer`, that will always immediately `return false`
  // to not have any impact on your app. We don't send any details on those interactions, besides the total count
  enableTouchBehaviourMonitoring: true,

  // Logs the number of seconds of the current session
  enableSessionDurationMonitoring: true,

  // Counts the number of screenshots taken during the current session
  enableScreenshotMonitoring: true,

  // Send a single ContextSDK event when your app is launched, and when it's put into the background. This allows us
  // to provide you with more in-depth insights on what contexts have a positive effect on session durations and upsells
  enableAutomaticAppStartAndEndTracking: true,

  // Keeps track of how often, and when users launch the app. This is stored locally using NSUserDefaults
  // and only aggregated metrics (like how many times the app was launched today) will be used
  enableAutomaticAppLaunchBehaviourLogging: true,

  // When true, ContextSDK will report unexpected errors back to us. Those are mostly to ensure smooth rollouts of new Machine Learning Models over the air.
  // Since CoreML models may introduce issues while parsing them, we'd then report those errors back to us, while also falling back to the default model to guarantee smooth operations
  enableErrorReporting: true,

  // When true, ContextSDK will run continually while the app is in the foreground, allowing you to immediately obtain a context,
  // without having to wait for ContextSDK to determine the real-world context. When false calling ContextSDK will always need to wait the full
  // duration, and using InstantContext / maxDelay: 0 will return a warning.
  // While instant context is enabled ContextSDK will use around 2% of a single CPU core continually. (e.g. for an iPhone with 6 cores, that means a total of 0.33% CPU usage)
  enableInstantContext: true
)

ContextManager.applicationDidFinishLaunchingWithOptions(launchOptions, licenseKey: "YOUR_LICENSE_KEY", configuration: configuration)
Done with the integration? Header over to the Release Section to go live with your app!